kickstartingLabNetworkingSetup
Spacewalk DHCP Kickstarting Lab Setup
This document describes steps required to put together a lab suitable for kickstarting machines independent of corp infrastructure. Isolation is required as part of the overall goal is to have spacewallk manipulate DHCP configuration directly, and having multiple DHCP servers on a single segment is problematic (not impossible however).
The lab consists of at least two nodes and exactly two network segments. One segment is internet connected for development purposes, the other is isolated to provide a pristine environment for development and testing. One node is a spacewalk with access to both network segments. One or more other nodes reside on the isolated segment as kickstart targets.
NOTE: You don't have to do this if your only goal is to find a way to install new baremetal machines via Cobbler. Cobbler provides a buildiso feature that allows you to bring up new hosts without configuring DHCP or setting up a lab. See https://fedorahosted.org/cobbler/wiki/BuildIso BuildIso. In addition, if you ask /very/ nicely, most admins can change the next-server address for just a couple of hosts and then you don't need to set up DHCP either. This is the way I have my office setup -- I just nicely asked helpdesk to point my server's next-server parameter to my laptop. -- mpd
There are a number of ways to accomplish the sort of network isolation required for this lab to work. Two of them are described here, a third gets brief mention: it's possible to do all of this inside of a single machine. That machine, however, would have to be sufficiently powerful to competently run both spacewalk and one or more virtual machines. As such machines are not the norm for spacewalk developers, this is left as an exercise to the reader. Two methods described here are: Spacewalk machine with two NICs (dual homed), and single NIC machines utilizing 802.1q VLAN trunking.BR
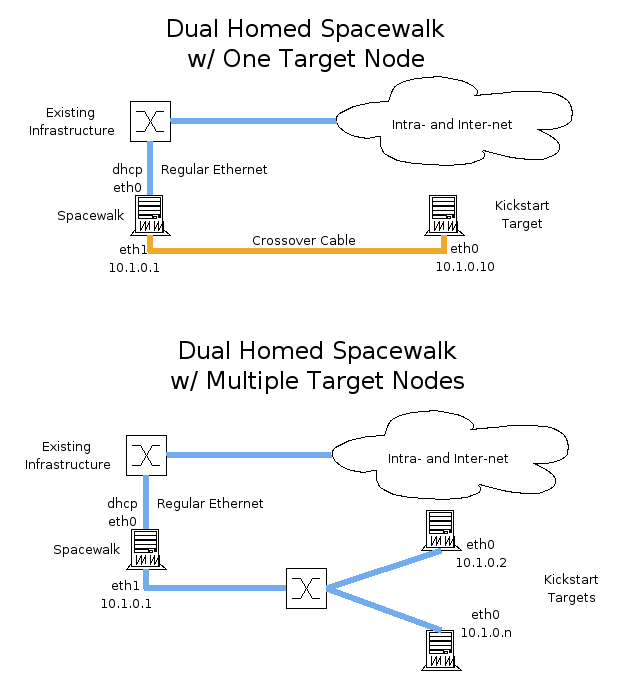
     1. A spacewalk machine with two network interface cards (NICs).
     1. One or more kickstart target machines
     1. A free switch port somewhere in your existing infrastructure
     1. Either:
       * A crossover ethernet cable or
       * A dedicated ethernet switch device – two or more ports plus regular ethernet cabling sufficient to connect each machine to the dedicated switch, plus one cable to connect the spacewalk machine to your existing infrastructure.
     1. Plug one of the two spacewalk machine's ethernets (recommended: eth0 or equivalent) into your existing infrastructure such that a dhcp request on that port will result in an IP address and gateway address that will route to the internet.

     1. Plug the other of the spacewalk machine's ethernets into one of the following:
       * an ethernet cable wired as a crossover cable, with the other end plugged into a single kickstart target machine
       * a regular ethernet cable connected to a dedicated ethernet switch
     1. If you chose to use a dedicated switch, plug one or more target machines into the dedicated switch using regular ethernet cables.
   1. On all machines, ensure that NetworkManager is disabled and shut down (if applicable to the distribution). You explicitly do '''not''' want any user-friendly daemons acting on your network interfaces. It is also a good idea to shut down any other unneeded services.

   2. On your spacewalk machine, edit files in /etc/sysconfig/network-scripts as follows:
     * ifcfg-eth0:

DEVICE=eth0
ONBOOT=yes
BOOTPROTO=dhcp
TYPE=Ethernet
     * ifcfg-eth1

DEVICE=eth1
ONBOOT=yes
BOOTPROTO=none
IPADDR=10.1.0.1
NETMASK=255.255.255.0
TYPE=Ethernet
     * Reboot your spacewalk machine – it should come up with two network interfaces active: eth0 and eth1. If dhcp in your infrastructure is functioning properly, there will be a default route through eth0 (check this with route -n)
   3. On your kickstart target machines, networking should be configured as follows:
     * On a bare-metal kickstart target, /etc/sysconfig/network-scripts/ should end up (after kickstarting) configured as:
       * ifcfg-eth0:

DEVICE=eth0
ONBOOT=yes
BOOTPROTO=dhcp
TYPE=Ethernet
     * On a VM host machine, configure as follows:
       * Add the following lines to the end of /etc/sysctl.conf to ensure that no netfilter logic acts on the bridge interface. (alternatively you could configure netfilter (iptables) for your installation):

net.bridge.bridge-nf-call-ip6tables = 0
net.bridge.bridge-nf-call-iptables = 0
net.bridge.bridge-nf-call-arptables = 0
net.bridge.bridge-nf-filter-pppoe-tagged = 0
net.bridge.bridge-nf-filter-vlan-tagged = 0
       * Configure network interfaces in /etc/sysconfig/network-scripts as follows:
        * ifcfg-eth0:

DEVICE=eth0
ONBOOT=yes
BOOTPROTO=none
TYPE=Ethernet
BRIDGE=swbr0
        * ifcfg-swbr0:

DEVICE=swbr0
TYPE=Bridge
BOOTPROTO=static
ONBOOT=yes
DELAY=0
IPADDR=10.1.0.10
NETMASK=255.255.255.0
DNS1=10.1.0.1
       * Reboot your kickstart target node(s). When they come up you should see one active network interface – swbr0. You should see only routes to the 10.1.0.x network.
       * NOTE: If for some reason you find that you need to connect a kickstart target machine to the internet connected portion of your infrastructure, you'll need to change ethernet connections so that the machine in question is connected to your main infrastructure, and change /etc/sysconfig/network-scripts to:
         * ifcfg-eth0:

DEVICE=eth0
ONBOOT=yes
BOOTPROTO=dhcp
TYPE=Ethernet
           Alternatively, you can configure your spacewalk machine as a router, and just add this to ifcfg-swbr0:

GATEWAY=10.1.0.1
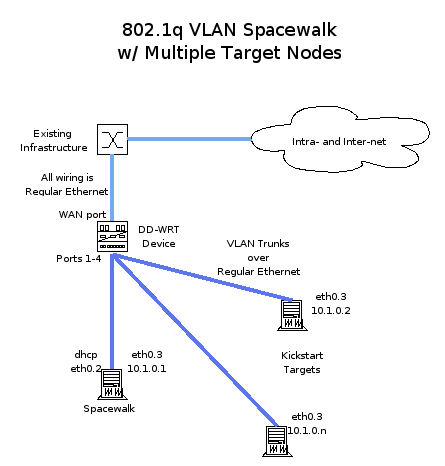
This method utilizes a programmable network switch and native linux networking capabilities to reduce spacewalk hardware requirements and improve flexibility and ease of use. The example provided is based on DD-WRT ( http://www.dd-wrt.com ) v24-sp1 firmware on a Linksys WRT54GL v1.1 router. This provides a mechanism by which remote developers can set up VLAN trunking with relative low cost and low complexity. Configuration varies only very slightly with other switch hardware. In the corp environment existing packet switching infrastructure should be substituted where appropriate. Note that VLAN trunking is a particularly useful method of configuration for large VM hosts in any corp environment that has multiple networks – should spacewalk care to take on the provisioning of VM hosts of this type, this configuration can act as a starting point of a model for that design work.
     1. A spacewalk machine with one network interface card (NIC).

     1. One or more kickstart target machines
     1. A free switch port somewhere in your existing infrastructure
     1. A Linksys WRT54GL v1.1 is known to work well with DD-WRT v24-sp1 and is the model the prototype network is based on. However, DD-WRT can run on many other routers and it is possible you have a compatible device at home already. Check here for a complete list: [http://www.dd-wrt.com/wiki/index.php/Supported_Devices http://www.dd-wrt.com/wiki/index.php/Supported_Devices][[BR]] '''NOTE: The firmware flash procedure described in this document is specific to the Linksys WRT 54GL series – if you intend to use a different device, you must be sure to follow the flash instructions specific to that device! '''
     1. Cabling sufficient to connect each machine to the DD-WRT device, plus one cable to connect the DD-WRT device to your existing infrastructure.
     1. Log into the router at [http://192.168.1.1/ http://192.168.1.1] as <nousername>/admin

     1. Flash the stock Linksys firmware with dd-wrt.v24_mini_generic.bin ( here: [http://www.dd-wrt.com/dd-wrtv2/downloads/v24-sp1/Consumer/Linksys/WRT54GL_1.1 http://www.dd-wrt.com/dd-wrtv2/downloads/v24-sp1/Consumer/Linksys/WRT54GL_1.1] ) using the firmware upgrade option. '''IMPORTANT: Let the router work – do not power cycle or reset during the flash. You may need to wait several minutes – be patient! '''
     1. Log into the router as root/admin
     1. Flash mini-generic with dd-wrt.v24_std_generic.bin (same place) via the Administration->Firmware Upgrade tab. '''IMPORTANT: Same as above – be patient and let the router do its thing! '''
     1. Log into the router as root/admin
     1. On the Administration->Management page, change the administrative user name and password to something other than the default.
     1. On the Setup->Basic Setup tab:
       * Set WAN connection type to Disabled
       * Set a static IP address and netmask in the Router IP section that's compatible with your existing infrastructure
       * Check (set) the “Assign WAN Port to Switch” checkbox.
       * Set the “DHCP Server” radio button to “Disabled”
     1. On the Wireless->Basic Settings page:
       * If you don't intend to use the wireless capabilities of the device, set “Wireless Network Mode” to “disabled” to prevent unwanted snooping.
       * If you do intend on using the wireless capabilities of the device, you should at the very least re-name the router from the default by changing the “Wireless Network Name” field. Other methods of securing the router are available on the various other tabs subtending the “Wireless” tab.
     1. On the Setup->VLANs page [[Image(snapshot16.png)]]
       * VLAN 0 acts as a uplink to the rest of your infrastructure.
       * VLAN 2 moves tagged traffic and is bridged to VLAN 0.
       * VLAN 3 moves tagged traffic and is isolated
       * Ports 1-4 are bound to VLANs 2 and 3, and manifest as a two-network 802.1q trunk to the node connected to it
       * NOTE: VLAN tag Ids 0 and 1 are problematic in the world of programmable switches. While the DD-WRT can deal with these, they're set as they are here in acknowledgment of that fact.
   1. Connect the WAN port to something that connects with the rest of your infrastructure such that a dhcp request on that segment will result in an IP address and gateway address that will route to the internet.

   1. Connect your spacewalk machine and one or more kickstart target machines to any of ports 1-4.
   1. On all machines, ensure that NetworkManager is disabled and shut down (if applicable to the distribution). You explicitly do '''not''' want any user-friendly daemons acting on your network interfaces. It is also a good idea to shut down any other unneeded services.

   1. On your spacewalk machine, edit files in /etc/sysconfig/network-scripts as follows:
     * ifcfg-eth0:

DEVICE=eth0
ONBOOT=no
BOOTPROTO=none
TYPE=Ethernet
     * ifcfg-eth0.2:

DEVICE=eth0.2
VLAN=yes
ONBOOT=yes
BOOTPROTO=dhcp
TYPE=Ethernet
     * ifcfg-eth0.3:

DEVICE=eth0.3
VLAN=yes
ONBOOT=yes
BOOTPROTO=none
IPADDR=10.1.0.1
NETMASK=255.255.255.0
TYPE=Ethernet
     * Reboot your spacewalk machine – it should come up with two network interfaces active: eth0.2 and eth0.3. If dhcp in your infrastructure is functioning properly, there will be a default route through eth0.2 (check this with route -n)
   1. A bare metal kickstart target requires the following in /etc/sysconfig/network-scripts
     * ifcfg-eth0:

DEVICE=eth0
ONBOOT=no
TYPE=Ethernet
BOOTPROTO=none
     * ifcfg-eth0.3:

VLAN=yes
DEVICE=eth0.3
ONBOOT=yes
BOOTPROTO=dhcp
TYPE=Ethernet
   1. On a target VM host machine(s), edit files in /etc/sysconfig/network-scripts as follows:
     * ifcfg-eth0:

DEVICE=eth0
ONBOOT=no
BOOTPROTO=none
TYPE=Ethernet
     * ifcfg-eth0.2:

DEVICE=eth0.2
VLAN=yes
ONBOOT=yes
BOOTPROTO=dhcp
TYPE=Ethernet
     * ifcfg-eth0.3:

VLAN=yes
DEVICE=eth0.3
BOOTPROTO=none
ONBOOT=yes
TYPE=Ethernet
BRIDGE=swbr0
     * ifcfg-swbr0:

DEVICE=swbr0
TYPE=Bridge
BOOTPROTO=static
ONBOOT=yes
DELAY=0
IPADDR=10.1.0.10
NETMASK=255.255.255.0
DNS1=10.1.0.1
   * On your VM host machine(s), add the following lines to the end of /etc/sysctl.conf:

net.bridge.bridge-nf-call-ip6tables = 0
net.bridge.bridge-nf-call-iptables = 0
net.bridge.bridge-nf-call-arptables = 0
net.bridge.bridge-nf-filter-pppoe-tagged = 0
net.bridge.bridge-nf-filter-vlan-tagged = 0
These lines ensure that no netfilter logic acts on the bridge interface. Alternatively you could configure netfilter (iptables) for your installation. * Reboot your kickstart target node(s). When they come up you should see one active network interface – swbr0. You should see only routes to the 10.1.0.x network. * NOTE: Each of your target nodes are configured to be internet connected as well should the need arise. To activate internet access on a target node, execute “ifup eth0.2”. Be sure to issue “ifdown eth0.2” when you're done to isolate the machine once again from the rest of your infrastructure. * NOTE: There is an alternate convention in linux for naming 802.1q ports – the pattern is vlanX and has some arguable advantages to the ethX.Y convention. Libvirt however appears to be incompatible with the vlanX convention, which is why the ethX.Y convention is used here.
 * Ensure that the following packages and their dependencies have been installed:

   * spacewalk (which will include cobbler, which will include tftpd)
   * koan (which will include syslinux (not on Fedora 16, at least))
   * dhcp
* If your target is to be a VM host, install packages appropriate to the technology you're going to provision with.[[BR]]
Note that this configuration is prelude to what will be spacewalk's ability to manipulate dhcp configuration directly. This stuff is for R&D purposes only.
Edit /etc/dhcpd.conf such that it looks like this:
ddns-update-style ad-hoc;
shared-network cloud{
	subnet 10.1.0.0 netmask 255.255.255.0 {
		# My kickstart network
		option subnet-mask 255.255.255.0;
		option broadcast-address 10.1.0.255;
		option routers 10.1.0.1;
		option domain-name-servers 10.1.0.1,10.1.0.2;
		option domain-name "mykickstart.redhat.com";
		range 10.1.0.100 10.1.0.254;
		next-server 10.1.0.1;
		filename "pxelinux.0";
		group {
			host target1.mykickstart.redhat.com{
				hardware ethernet <mac addr of target eth0>;
				fixed-address 10.1.0.10;
			}
		}
	}
}
   * Note that the above configuration provides an example of two different ways of allocating addresses to nodes.
     * by using the “range” directive and providing a range of addresses within the subnet, dhcp will react to machines with unknown MAC addresses by issuing a lease on an IP address in that range to the machine in question.
     * by defining a “host” entity with a “hardware ethernet” and “fixed-address” pair, dhcp will react to a machine presenting the MAC in question by issuing the specified fixed IP address assignment.
   * edit the file /etc/xinetd.d/tftp and alter the line that says “disable = yes” to “disable = no”

   * just run "cobbler check" and it will report on problems like this.
   * execute service xinetd restart
(And virtuals, once they're set up)
   1. You need to ensure that the machine's BIOS is set to fall through to PXE bootstrap. Bootstrap order should be
     a. first hard drive
     a. cdrom
     a. pxe
   1. To prepare a node for bare metal kickstart, execute “dd if=/dev/zero of=/dev/<hard disk device e.g. hda> bs=512 count=1”.  '''WARNING: This command destroys your system's boot sector and partition map – it wipes out the drive for all intents and purposes. Obviously: don't issue this command on any machine, physical or otherwise, unless you can afford to loose its contents forever!!! '''


NOTE:  a safer approach is to just set the machine to PXE boot the first time in the cycle, and use Cobbler with the pxe_just_once flag enabled so that once the machine installs it will get a PXE config file that says "boot locally" and then we use that to control what falls through to the local disk.  This way the "blitz MBR" hack is never needed.


ANOTHER NOTE:  "cobbler buildiso" allows for a nice way to setup infrastructure that is PXE-like without needing PXE, and provides a good option to bring up hosts without the above instructions.   This eliminates the need to set up DHCP in the first place and still provides a bare-metal install solution.
* Create one or more virtual machines using whatever technology is appropriate, and then prepare the machines as you would a bare metal target
1. If you're using qemu/kvm, test your configuration by running virt-manager on a target vm host machine. If you are using the VLAN configuration, select “Shared physical device” and select “eth0.3 (Bridge: swbr0)”. In a non-vlan environment you should select “eth0 (Bridge:swbr0)”.
